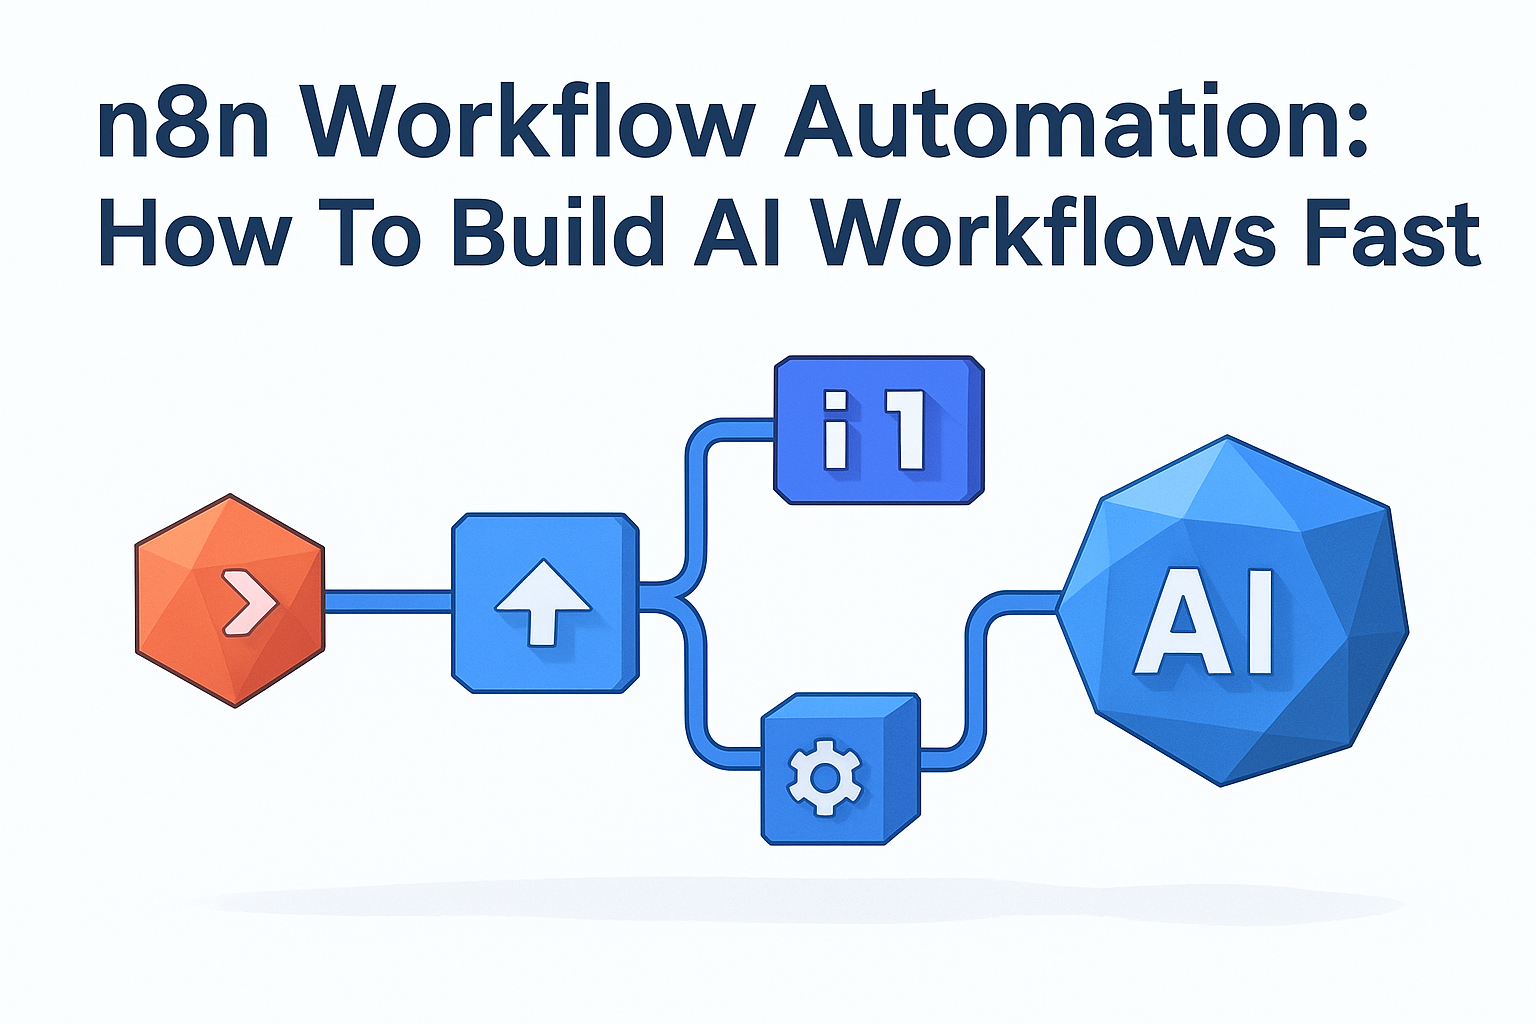
n8n Workflow Automation: How To Build AI Workflows Fast
At AI Flow Chat
Contents
0%n8n has become one of the most talked-about tools for building automated workflows, and for good reason. n8n workflow automation gives you a visual, node-based editor where you can connect APIs, AI models, databases, and hundreds of apps without writing backend code from scratch. It's open-source, self-hostable, and extremely powerful once you know what you're doing.
That last part is the catch. n8n is built for developers and technical operators. If you're a creator, marketer, or agency owner trying to automate content workflows, the learning curve can hit hard. Setting up instances, configuring credentials, debugging node connections, it adds up fast. That's exactly the gap we built AI Flow Chat to fill: a visual AI workflow platform that gives non-technical users repeatable automation and multi-source content generation without needing a self-hosted server or API knowledge.
But here's the thing, n8n is genuinely excellent at what it does, and understanding how it works will make you a sharper operator regardless of which tool you choose. This guide breaks down how n8n's workflow automation actually works, walks you through building AI workflows step by step, covers self-hosting vs. cloud options, and gives you practical use cases you can steal. Whether you end up running n8n, using a platform like AI Flow Chat, or combining both, you'll leave with a clear picture of what's possible.
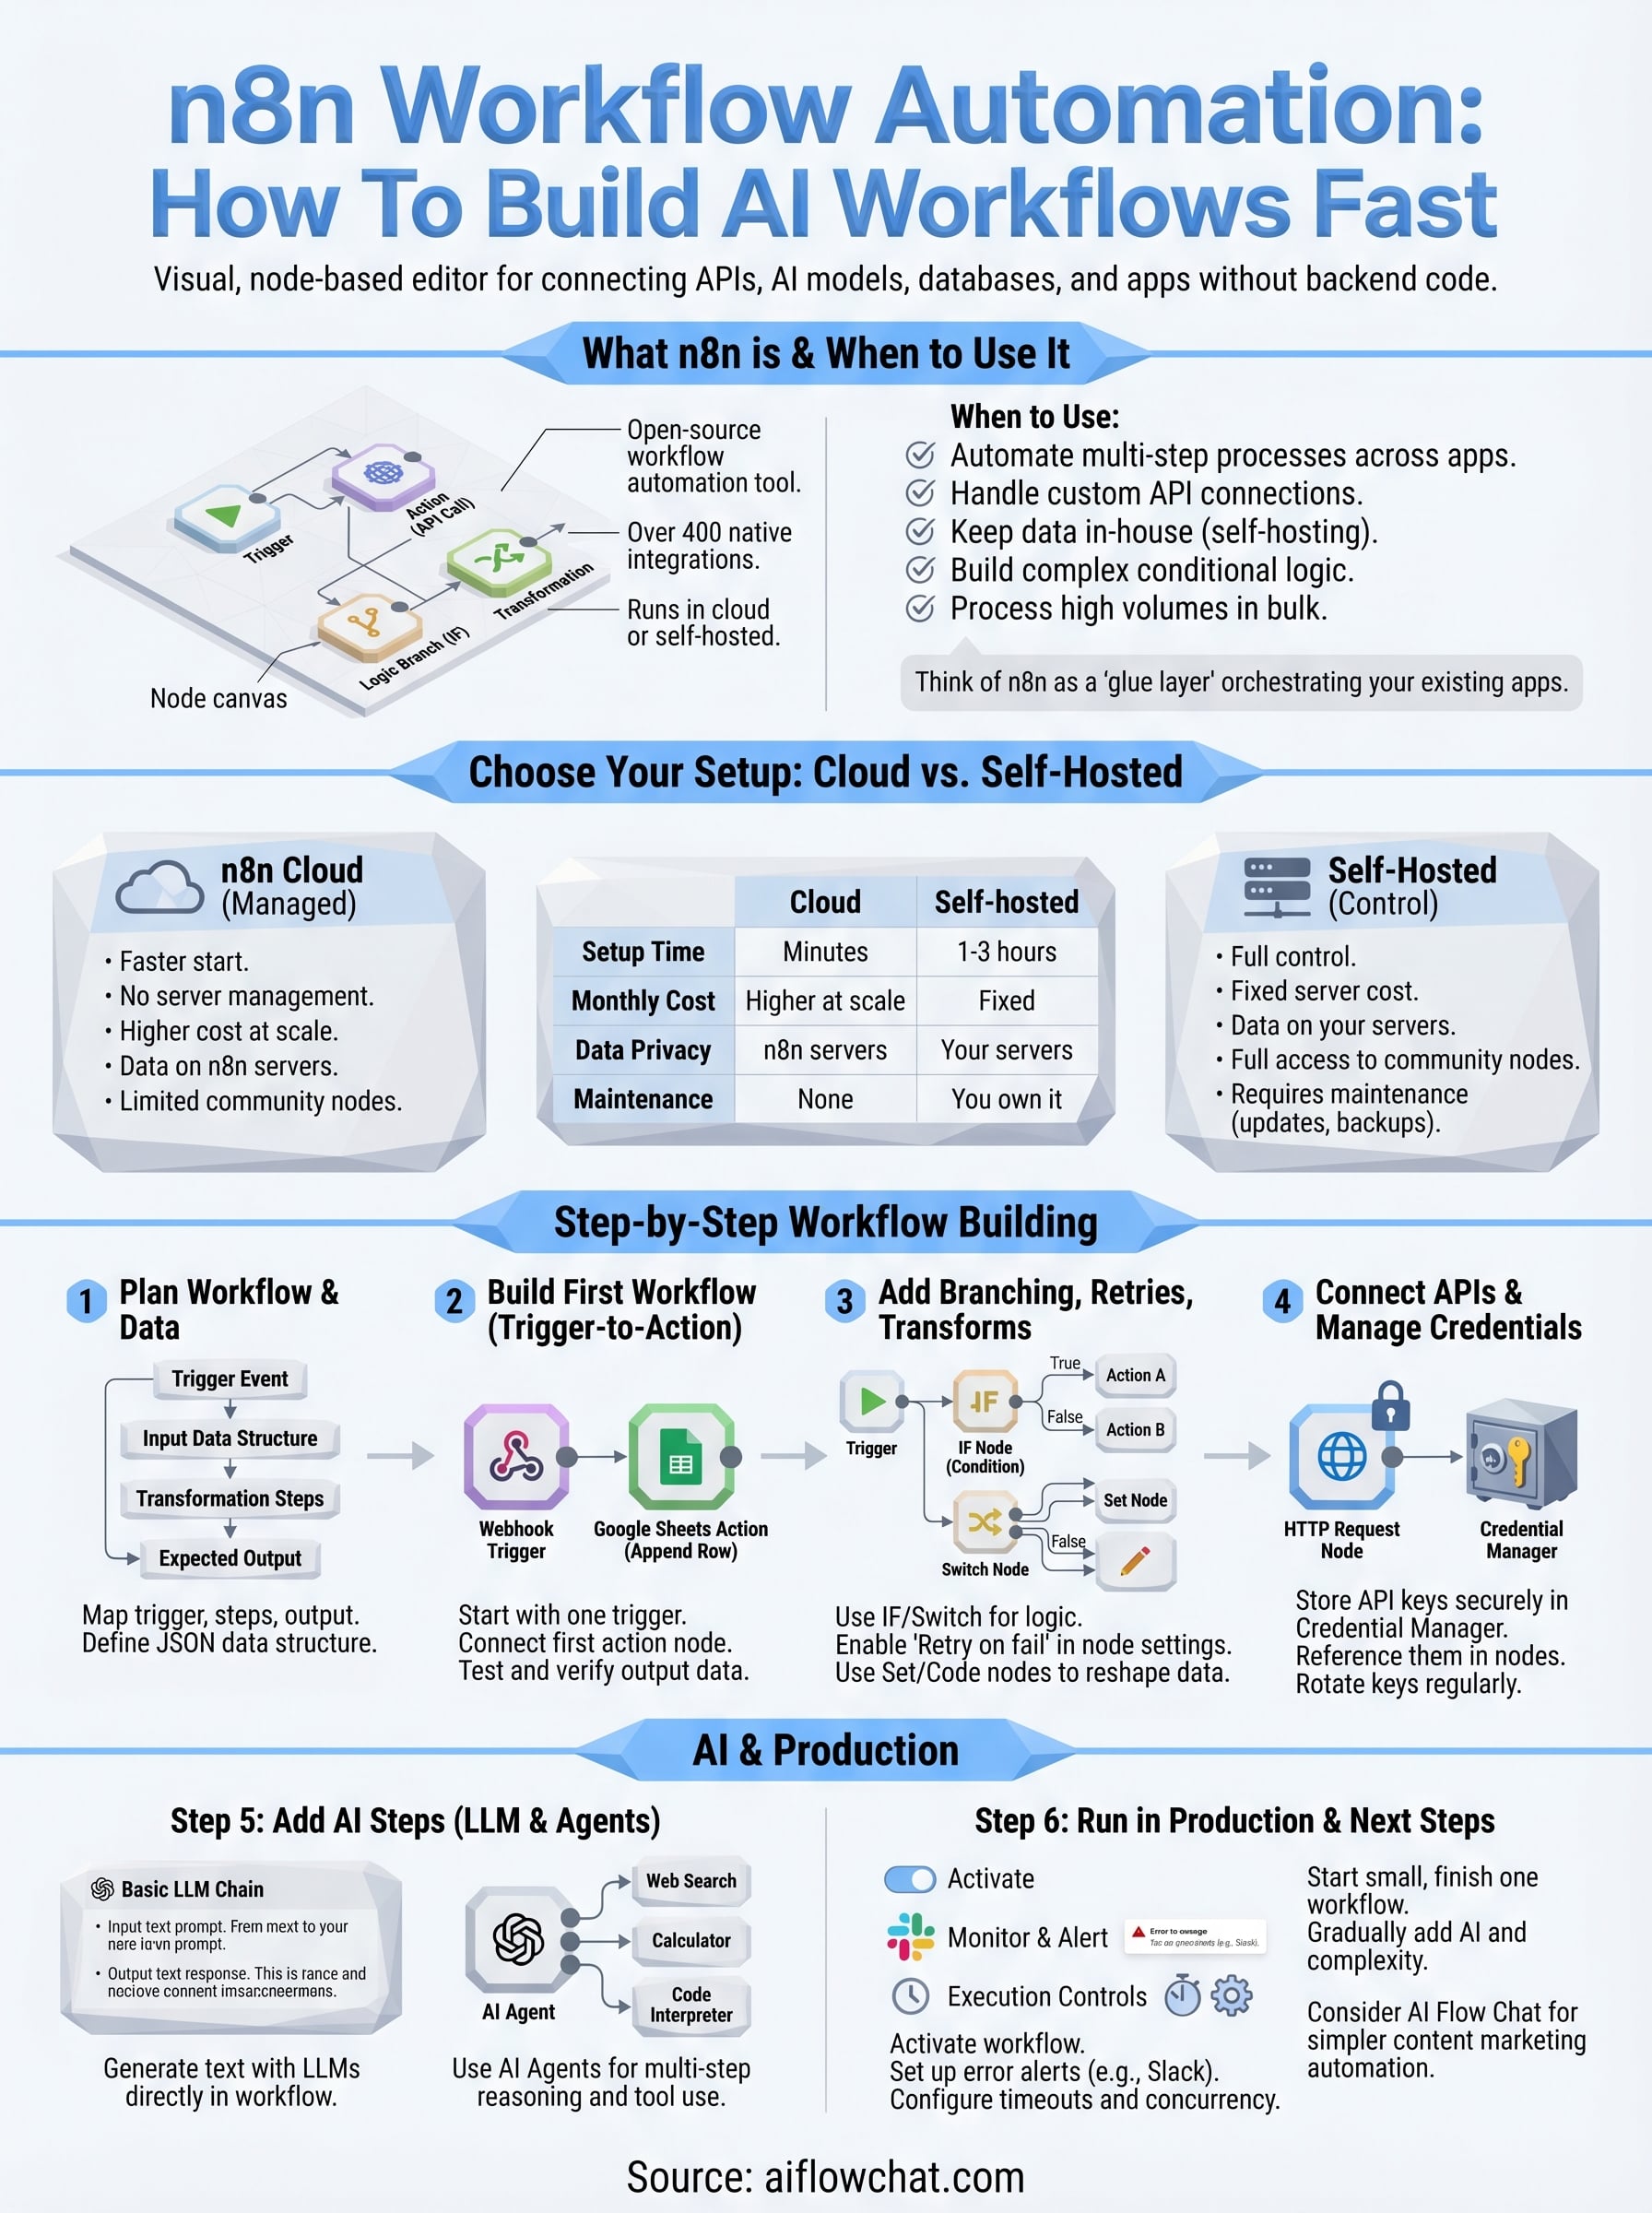
What n8n workflow automation is and when to use it
n8n is an open-source workflow automation tool that lets you connect apps, APIs, and AI models through a visual node-based editor. Each "node" in n8n represents one step in a workflow: a trigger, a transformation, an API call, or a logic branch. You wire nodes together on a canvas, and n8n executes them in sequence when a trigger fires. The platform currently offers over 400 native integrations, covering everything from Google Sheets and Slack to OpenAI and Postgres, and it runs either in the cloud or on your own server.
How n8n's node-based editor works
When you open n8n, you land on a blank canvas. You start by placing a trigger node, which defines what kicks off the workflow. That might be a scheduled cron job, an incoming webhook, a new row in a database, or a form submission. From there, you chain action nodes that do something with the incoming data: send an HTTP request, query a database, call an AI model, or reformat a value before passing it forward.
Every node has an input panel and an output panel. Data flows between nodes as JSON objects, and you reference specific fields using n8n's expression syntax. Here's what that looks like in practice:
{{ $json.email }}
{{ $node["HTTP Request"].json.response }}
{{ $json.firstName + " " + $json.lastName }}
You can inspect each node's output after a test run, which makes debugging straightforward. n8n also supports sub-workflows, meaning you can build reusable logic blocks and call them from multiple parent workflows without duplicating nodes across your entire setup.
When n8n workflow automation fits your situation
n8n shines in specific scenarios, and knowing those upfront saves you from overengineering a solution. It's a strong fit when you need to:
- Automate multi-step processes that cross several apps with no native integration between them
- Handle custom API connections where no off-the-shelf connector exists in simpler tools
- Keep data in-house by self-hosting so nothing passes through third-party cloud servers
- Build conditional logic where different branches run depending on the input data
- Process high volumes of records in bulk on a recurring schedule without manual effort
n8n is best understood as a glue layer: it doesn't replace your existing apps, it orchestrates them so data moves between them automatically and on your schedule.
For example, a marketing team might use n8n workflow automation to pull lead data from a CRM, enrich it through a third-party API, push the result to a Google Sheet, and trigger a personalized Slack notification, all without any manual copy-paste work between steps.
When n8n is not the right fit
Not every automation problem belongs in n8n. If your main goal is to generate content at scale, analyze social videos, or build AI-driven content pipelines, n8n can technically handle parts of that, but it demands significant setup time for each AI step. You need to configure API credentials manually, write prompt logic from scratch, and handle model outputs yourself with custom expressions.
You'll also run into friction if your team lacks a technical background. n8n assumes you're comfortable with JSON data structures, expression syntax, and basic API concepts like authentication headers and response parsing. Without that foundation, debugging failed runs becomes genuinely painful and time-consuming. For creators and marketers who need fast, repeatable content workflows, that overhead often outweighs the raw flexibility n8n provides.
Choose an n8n setup: cloud vs self-hosted
Before you build a single node, you need to decide where n8n runs. This choice affects your data privacy, execution limits, pricing, and how much infrastructure work you take on. n8n gives you two paths: a managed cloud option and a self-hosted setup on your own server or VPS. Neither is universally better, so pick based on your actual constraints, not what sounds more technically impressive.
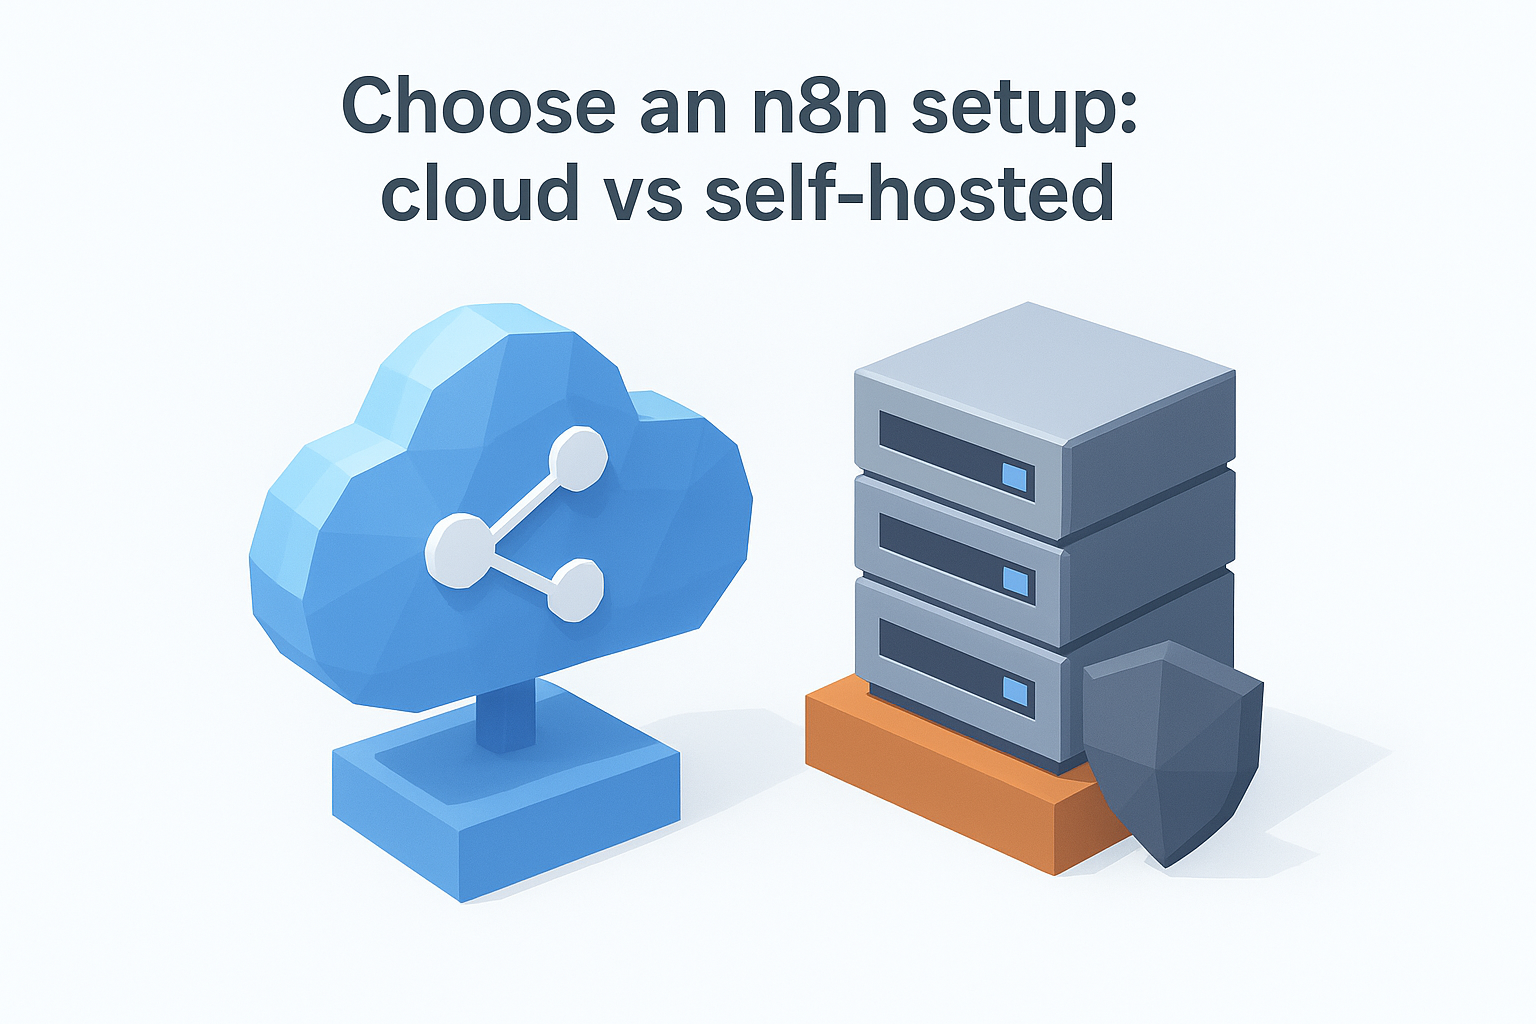
n8n Cloud: the faster start
n8n Cloud is the managed, hosted version of the platform where n8n handles servers, updates, and uptime on your behalf. You sign up, get a workspace URL, and start building immediately. There's no command line, no Docker configuration, and no SSL certificate setup required. This path makes sense if you want to validate workflows quickly before committing to infrastructure overhead, or if your team doesn't have a DevOps background to maintain a server reliably.
The main trade-off is cost at scale. n8n Cloud's pricing is based on workflow executions, and high-volume automations can push your monthly bill significantly higher than running the same workload on a $10/month VPS.
Self-hosted n8n: full control, your infrastructure
Self-hosting puts the n8n instance on your own machine, cloud VM, or server. This gives you complete data control, no execution-based pricing caps, and the ability to install community nodes that aren't available on the cloud plan. The most common setup uses Docker, and the official quickstart gets you running in a few commands:
docker run -it --rm \
  --name n8n \
  -p 5678:5678 \
  -v ~/.n8n:/home/node/.n8n \
  n8nio/n8n
Once you move to production, swap the run command for Docker Compose with persistent volumes and a reverse proxy like Nginx or Caddy to handle HTTPS properly.
This approach requires you to manage server updates, backups, and credential encryption yourself. For teams that handle sensitive client data or need to keep workflows entirely off third-party servers, that trade-off is worth it.
Which option fits your situation
Use this table to make the call quickly:
| Factor | n8n Cloud | Self-hosted |
|---|---|---|
| Setup time | Minutes | 1-3 hours |
| Monthly cost | Higher at scale | Fixed server cost |
| Data privacy | n8n servers | Your servers |
| Community nodes | Limited | Full access |
| Maintenance burden | None | You own it |
For most people exploring n8n workflow automation for the first time, cloud is the right starting point. Switch to self-hosted once you know the workflows you're running are production-ready and the execution volume justifies the infrastructure work.
Step 1. Plan the workflow and data you need
Skipping the planning phase is the fastest way to waste hours inside n8n. Before you open the editor and start placing nodes, you need a clear picture of what kicks the workflow off, what data enters the workflow, and what the final output should look like. Jumping straight into building forces you to redesign your node structure mid-way when you realize the data shape doesn't match what a downstream node expects.
The clearest workflows on paper are also the easiest ones to debug when something breaks in production.
Map the trigger, steps, and expected output
Every reliable n8n workflow automation starts as a plain-language description before it becomes a node diagram. Write down the trigger event, each transformation in between, and the final action the workflow should take. Keeping this linear and specific lets you translate each line directly into a node without guessing.
Use this planning template before touching the canvas:
| Stage | Question to answer |
|---|---|
| Trigger | What event starts this workflow? |
| Input data | What data does the trigger provide? |
| Steps | What needs to happen to that data? |
| Output | Where does the final result go? |
| Error case | What should happen if a step fails? |
For example, if you're building a lead enrichment workflow, your plan might read: "A new row in Google Sheets triggers the workflow. The workflow reads the email field, sends it to a third-party enrichment API, writes the result back to the same row, and posts a Slack summary." That one paragraph maps to exactly five nodes.
Define the data structure before you build
Once your plan is written out, identify the exact fields your workflow needs to read and write at each step. n8n passes data as JSON objects between nodes, so knowing the field names before you build saves you from writing expressions blind and then editing them after every failed test run.
Here's a simple field map for the lead enrichment example:
{
  "email": "user@example.com",
  "firstName": "Alex",
  "company": "",
  "enrichedTitle": "",
  "enrichedLinkedIn": ""
}
Fields like company, enrichedTitle, and enrichedLinkedIn start empty and get populated by downstream nodes. Mapping this ahead of time tells you precisely which expressions to write and which API response fields to extract. Your workflow logic becomes a deliberate design decision made once, not something you patch together on the fly mid-build.
Step 2. Build your first trigger-to-action workflow
With your plan in hand, open the n8n editor and create a new workflow. The canvas starts blank, and your job is to place nodes from left to right in the order your plan describes. Every n8n workflow automation starts with exactly one trigger node, so that's always your first placement. Click the "+" button on the canvas, search for your trigger type, and select it from the node panel.
Set up your trigger node
The trigger node defines the entry point for your workflow. For a beginner build, a Webhook trigger or a Schedule trigger is the cleanest starting point because both are straightforward to configure and test without needing a third-party app connected first. To use a webhook trigger, open the node settings, copy the generated webhook URL, and send a test HTTP POST request to it using a tool like Postman or your browser's fetch API. n8n will capture the incoming payload and display the JSON data structure in the node's output panel.
Confirming your trigger receives the right data shape before connecting any action nodes saves you from rewiring expressions later when the structure doesn't match.
For a Schedule trigger, set the cron expression in the node settings panel. Here's a quick reference for common schedules:
| Schedule | Cron expression |
|---|---|
| Every hour | 0 * * * * |
| Every day at 9am | 0 9 * * * |
| Every Monday at 8am | 0 8 * * 1 |
| Every 15 minutes | */15 * * * * |
Connect your first action node
Once your trigger fires and returns data, click the "+" connector on the right side of the trigger node to add your first action. For a simple lead enrichment or notification workflow, an HTTP Request node or a Google Sheets node works well as the first real action. Open the node settings, select the correct operation (for example, "Append Row" in Google Sheets), and map the incoming trigger fields to the corresponding columns using n8n's expression syntax.
Your field mapping inside the node will look like this:
Email column:      {{ $json.email }}
First name column: {{ $json.firstName }}
Timestamp column:  {{ $now.toISO() }}
Test the run before adding more nodes
Run a manual test execution after wiring the trigger to the first action node. Click "Test workflow" in the top bar and check each node's output panel individually. n8n highlights failed nodes in red and shows the exact error message, so you can fix the issue on this single connection before layering in more complexity. Confirm the output data matches your field map from Step 1, then save the workflow before moving forward.
Step 3. Add branching, retries, and data transforms
Once your basic trigger-to-action workflow runs cleanly, the next step is making it smarter. Real n8n workflow automation rarely follows a single straight path: data arrives in unpredictable shapes, API calls fail occasionally, and different input values should trigger different actions. Adding branching logic, retry handling, and data transforms at this stage turns a fragile prototype into a workflow you can trust in production.
Use IF and Switch nodes to branch logic
n8n provides two core nodes for conditional routing. The IF node splits your workflow into two branches: a "true" path and a "false" path based on a condition you define. The Switch node routes data to multiple branches depending on a field value, similar to a case statement in code. Both nodes accept n8n expressions, so you can branch on any JSON field coming from an upstream node.
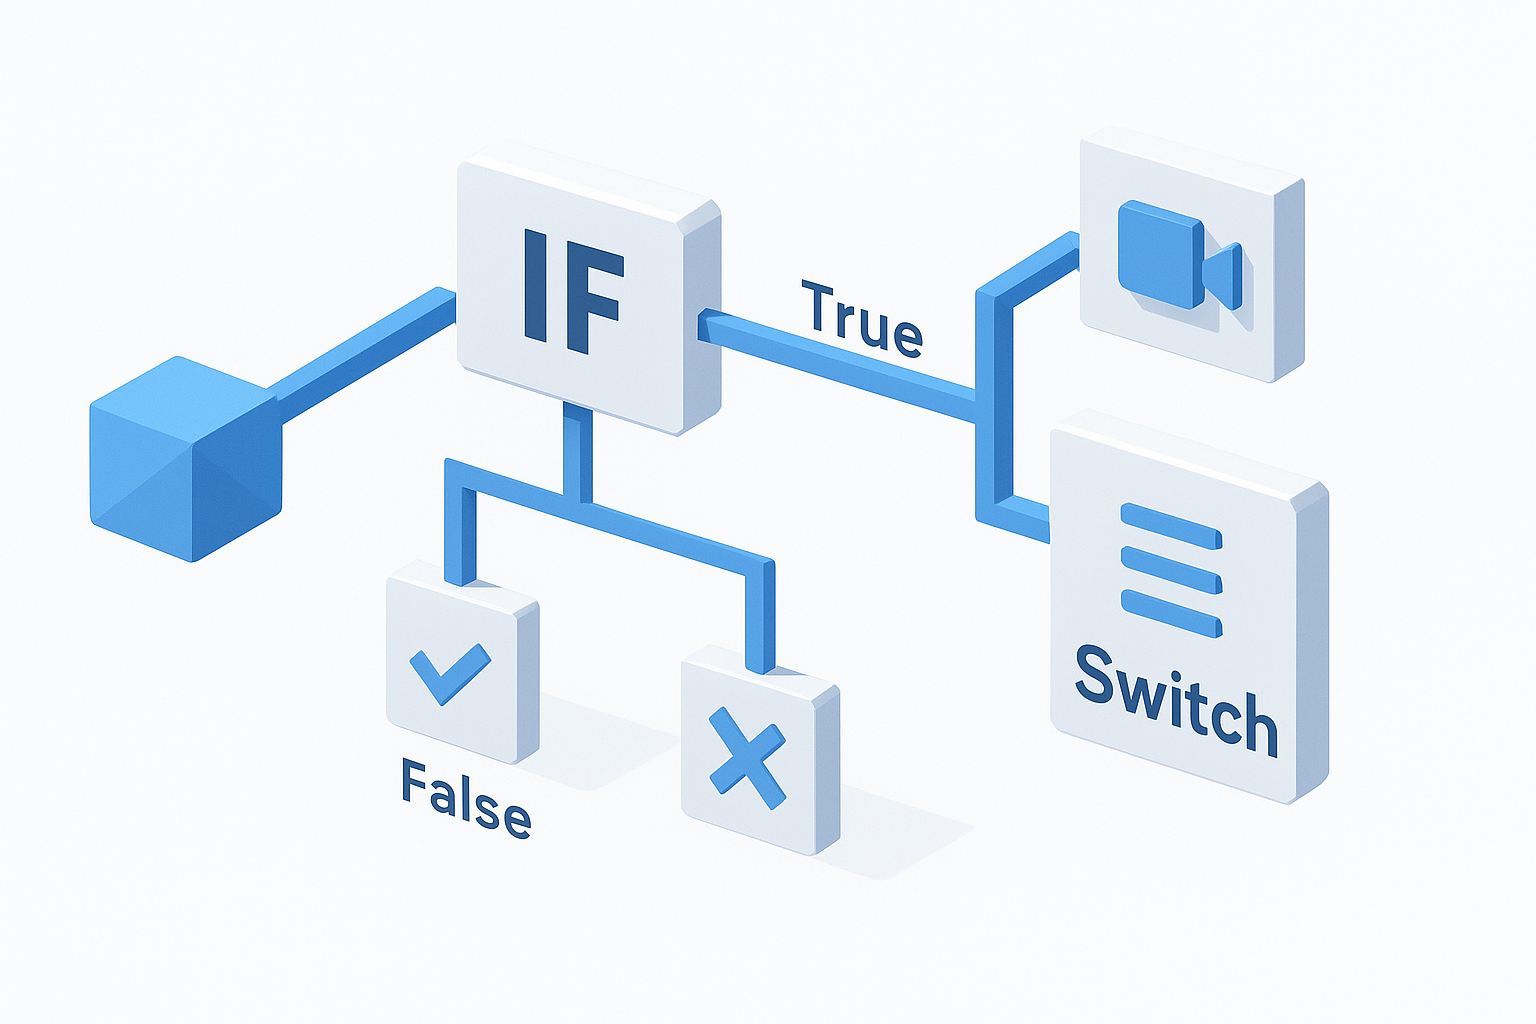
Use Switch nodes instead of chaining multiple IF nodes when you have more than two possible outcomes: it keeps your canvas readable and your logic easier to follow.
A common branching setup for a content workflow looks like this:
| Condition | Branch | Action |
|---|---|---|
$json.status === "approved" | True | Publish to CMS |
$json.status !== "approved" | False | Send Slack review request |
$json.type === "video" | Switch: video | Call video API |
$json.type === "blog" | Switch: blog | Call writing API |
Set up retries and error handling
API calls fail. Rate limits hit at unexpected times. Rather than letting a single failed node crash your entire workflow, configure retry behavior directly on each action node. Right-click any node on the canvas, open its settings panel, and enable the "Retry on fail" option. You can set the number of retry attempts and the wait time between them without writing any custom logic.
For errors that shouldn't silently retry, add a dedicated Error Trigger workflow in your n8n settings. This separate workflow fires automatically whenever any other workflow hits an unhandled failure, and you can wire it to send an alert to Slack or log the error to a Google Sheet so nothing gets missed.
Transform data with the Set and Code nodes
Before data reaches a downstream node, you often need to reshape or clean it. The Set node lets you create new fields, overwrite existing ones, or strip out fields you don't need. For more complex transformations, the Code node runs plain JavaScript directly inside the workflow:
return items.map(item => ({
  json: {
    fullName: item.json.firstName + " " + item.json.lastName,
    emailDomain: item.json.email.split("@")[1],
    processedAt: new Date().toISOString()
  }
}));
Run a test execution after adding each transform to confirm the output shape matches what the next node expects before continuing the build.
Step 4. Connect APIs and manage credentials safely
Most n8n workflow automation builds depend on at least one external API, and how you store and reference credentials determines whether your workflows stay secure when they run in production. n8n has a built-in credential manager that stores API keys, OAuth tokens, and passwords encrypted at rest, separate from the workflow definitions themselves. This means you can share a workflow template with a team member without exposing the actual secrets embedded in the JSON.
Add credentials through n8n's credential manager
You add credentials once in n8n and then reference them by name inside any node that needs them. Open the Credentials section from the left sidebar, click "Add credential," and select the service type from the list. n8n will prompt you for the exact fields that service requires, such as an API key, a base URL, or OAuth client credentials. Once saved, every node of that type in your account can select the credential from a dropdown without you re-entering the key.
Never paste API keys directly into node parameter fields as plain text: store them through the credential manager so they stay encrypted and out of your workflow's exported JSON.
Here is how a typical HTTP Request node references a stored credential using header authentication:
Authentication: Header Auth
Header Name:    Authorization
Header Value:   Bearer {{ $credentials.myApiKey }}
For OAuth2 services like Google Sheets or Slack, n8n handles the token refresh cycle automatically once you complete the initial OAuth handshake in the credential setup screen.
Follow safe credential practices
Storing credentials inside n8n's manager is the baseline, but a few additional practices keep your setup from becoming a liability as your workflow library grows. First, create separate credential entries for each environment: one set for testing and a distinct set for production. This prevents a test workflow from accidentally writing data to your live systems when you fire a manual run.
Second, rotate API keys on a schedule and update the credential entry in n8n immediately after rotation. Because credentials are stored centrally and referenced by name, updating one entry fixes every workflow that uses it simultaneously without any node-level edits. If you are running a self-hosted instance, confirm that your N8N_ENCRYPTION_KEY environment variable is set to a strong, unique string before you store any credentials, since this key controls how n8n encrypts everything in its database.
# Set in your Docker environment or .env file
N8N_ENCRYPTION_KEY=your-long-random-string-here
Step 5. Add AI steps with LLM and agent nodes
n8n's AI-native nodes make it possible to insert language model calls directly into your n8n workflow automation without leaving the canvas. You can chain an LLM node right after a data-fetching step so the model receives real, structured input instead of a static prompt. The result feeds forward into the next node like any other JSON output, which means your AI step behaves identically to every other part of the workflow: testable, inspectable, and rerunnable on demand.
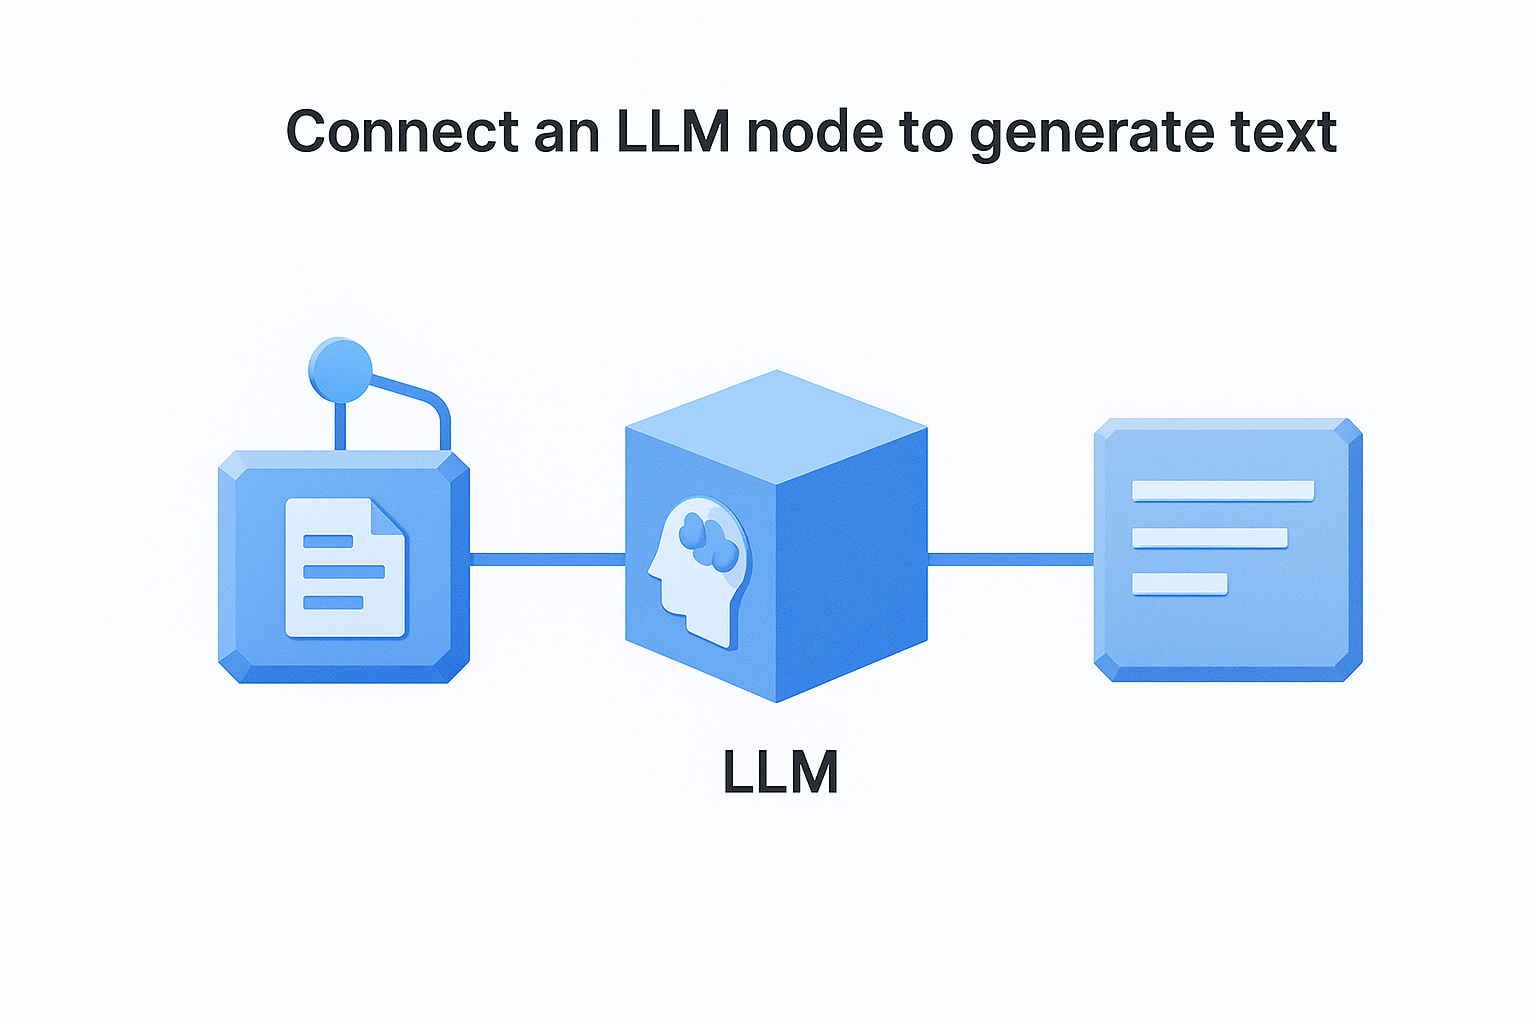
Connect an LLM node to generate text
Adding an LLM node takes the same steps as any other action node. Click the "+" connector after your last node, search for "Basic LLM Chain" in the node panel, and select it. Inside the node settings, pick your model provider (OpenAI, Anthropic, or Google Gemini), select the linked credential, and write the prompt. Reference upstream data using the standard expression syntax so the prompt stays dynamic:
You are a content analyst.
Summarize the following article in three bullet points:

{{ $json.articleBody }}

Respond in plain text only.
Keep your system prompt and user prompt in separate fields inside the node: mixing them into one string makes the output less predictable and harder to debug across model providers.
The node returns the model's response as a string field on the output JSON, typically at $json.text or $json.response depending on the provider. Map that output field directly into your next node, such as writing the summary to a Google Sheet column or inserting it into a Slack message body.
Use AI Agent nodes for multi-step reasoning
The AI Agent node in n8n goes further than a single LLM call: it lets the model decide which tools to call and in what order based on the goal you set. You attach tool nodes to the agent, such as a web search, a calculator, or a custom HTTP Request, and the agent selects and sequences them at runtime. Use this node when your task requires reasoning across multiple steps rather than a straightforward prompt-response cycle.
Configure the agent by writing a clear goal in the system message field and connecting at least one tool node to the agent's "Tools" input:
| Tool node | What it gives the agent |
|---|---|
| HTTP Request | Live data from any API |
| Code node | Custom logic or calculations |
| Google Sheets | Read or write structured data |
| Wikipedia | Factual lookups |
Start with a narrow, specific goal in the system prompt. Broad instructions produce inconsistent tool-selection behavior and outputs that are difficult to debug when the workflow runs on a recurring schedule.
Step 6. Run it reliably in production
Moving a workflow from test runs to live production is where most n8n workflow automation projects stall. A workflow that passes manual tests can still break silently in production when API responses change shape, rate limits kick in, or your server runs out of memory mid-execution. The steps below give your workflow the monitoring, error alerts, and execution controls it needs to run consistently without you watching it.
Activate, monitor, and alert on failures
Once you're satisfied with test runs, activate the workflow by toggling the "Active" switch in the top-right corner of the editor. This enables the trigger so it fires automatically on its defined schedule or incoming webhook events. From the Executions tab in the left sidebar, you can view a full log of every run: its start time, duration, status, and the exact node where a failure occurred if one happened.
Check your Executions log daily for the first week after a workflow goes live: catching early failures quickly tells you whether your data assumptions from the planning phase held up in real conditions.
Set up an Error Trigger workflow specifically for production monitoring. Create a separate workflow, add an "Error Trigger" node as its starting point, and wire it to a Slack notification or an email action. Every time any active workflow in your n8n instance hits an unhandled error, this monitor fires automatically and sends you the workflow name, the failed node, and the error message. Here is a minimal Slack message template for that notification node:
Workflow failed: {{ $json.workflow.name }}
Node: {{ $json.execution.lastNodeExecuted }}
Error: {{ $json.execution.error.message }}
Run ID: {{ $json.execution.id }}
Lock down execution settings
Uncapped workflows can spike your server's CPU or exhaust API rate limits if they trigger more frequently than expected. Open your workflow's settings panel from the top-right menu and configure two values before going live: set a timeout limit in seconds so runaway executions stop automatically, and enable "Save manual executions" so test runs stay visible in the log for comparison against production runs.
For high-volume scheduled workflows, add a concurrency limit by setting "Max concurrent executions" to 1 in the workflow settings. This prevents overlapping runs from stacking up when one execution takes longer than the trigger interval and ensures your downstream APIs receive requests at a controlled, predictable rate.
Next steps
You now have a complete picture of how n8n workflow automation works, from planning your data structure through running reliable production workflows with error monitoring in place. The path forward is clear: pick one real automation problem you face today, apply the six-step process from this guide, and ship a working workflow before you move on to the next one. Starting small and finishing one complete workflow beats planning five that never get built.
Once you have your first workflow running in production, build on it gradually by adding AI steps, branching logic, and more API connections one layer at a time.
If your main goal is content creation and marketing automation rather than backend data pipelines, the setup overhead of n8n may slow you down more than it helps. AI Flow Chat gives you the same visual, multi-step workflow approach built specifically for creators and marketers, with multi-source AI analysis, repeatable flowcharts, and no server setup required.
Continue Reading
Discover more insights and updates from our articles
Writing SEO content without a clear brief is like building a house without blueprints, you'll waste time, miss key details, and end up reworking most of it. A good content brief generator takes the gu...
Every manual task inside your CRM, updating a lead status, sending a follow-up email, assigning a case to the right rep, costs time you could spend on work that actually moves revenue. Salesforce work...
Most people use "content strategy" and "content marketing strategy" interchangeably. They're not the same thing. The difference between them isn't just semantics, it affects how yo...